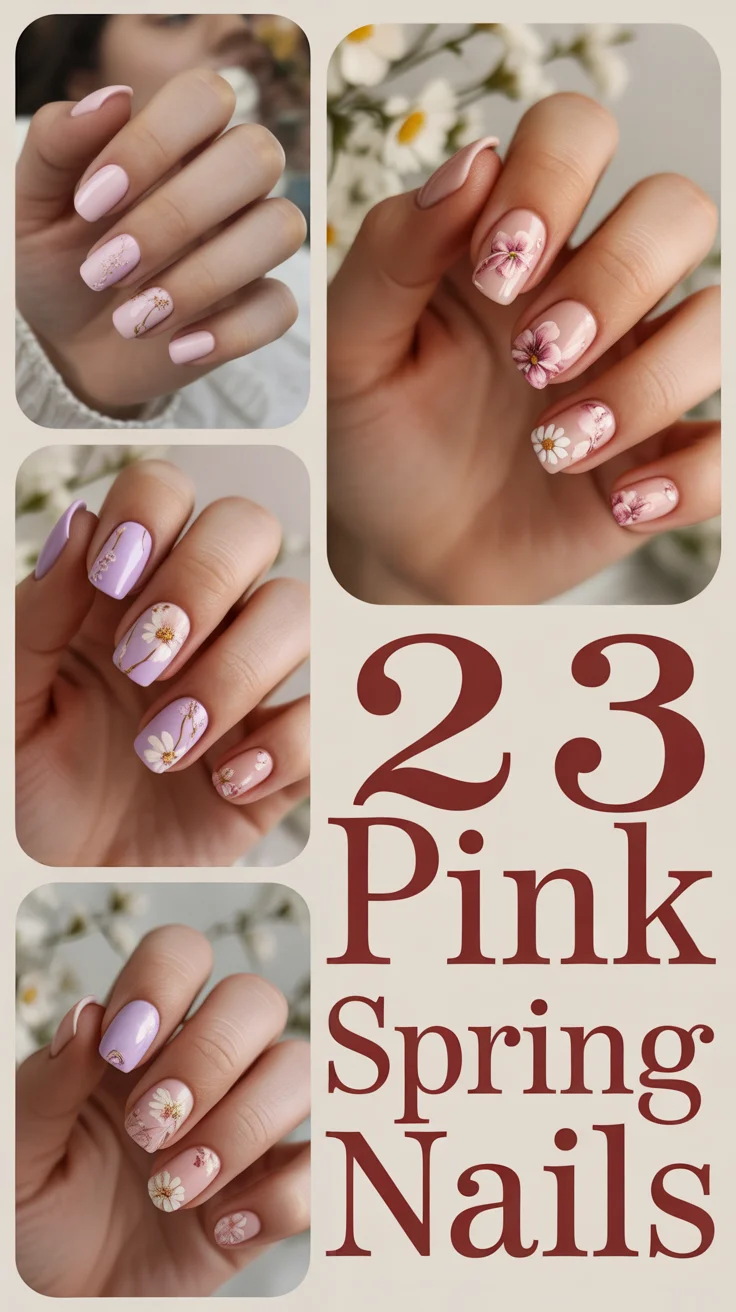
Temperatures start doing that sneaky little climb, coffee turns iced, and suddenly I want everything to feel fresh – including my nails. But what actually makes pink spring nails feel modern in 2026 instead of “same old baby pink”? Is it the shape, the finish, the tiny floral details, the negative space? And how do you pull it off at home without it looking messy?
Below are twenty three looks I keep coming back to when I want soft, pretty, and still interesting – the kind of manicure that makes you glance at your hands while you’re holding a matcha. I’ll walk you through the vibe, the products, and the easiest way to recreate each one.
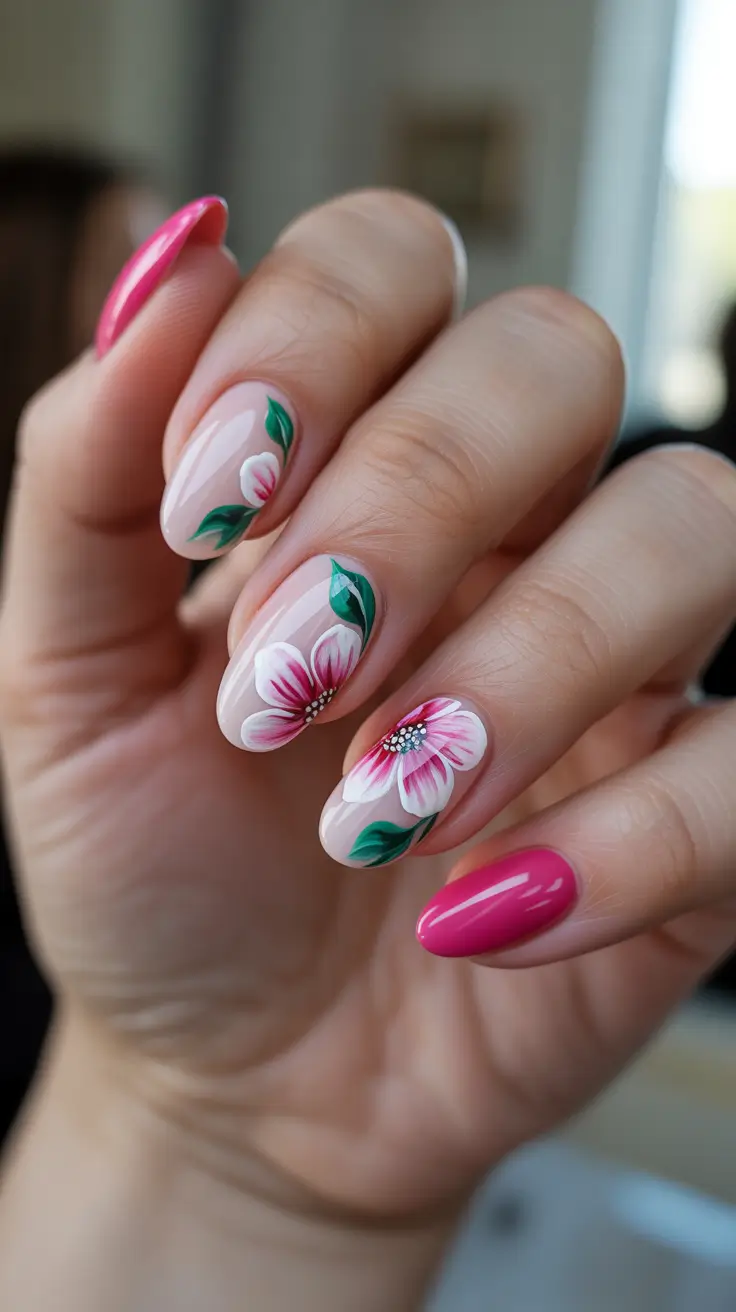
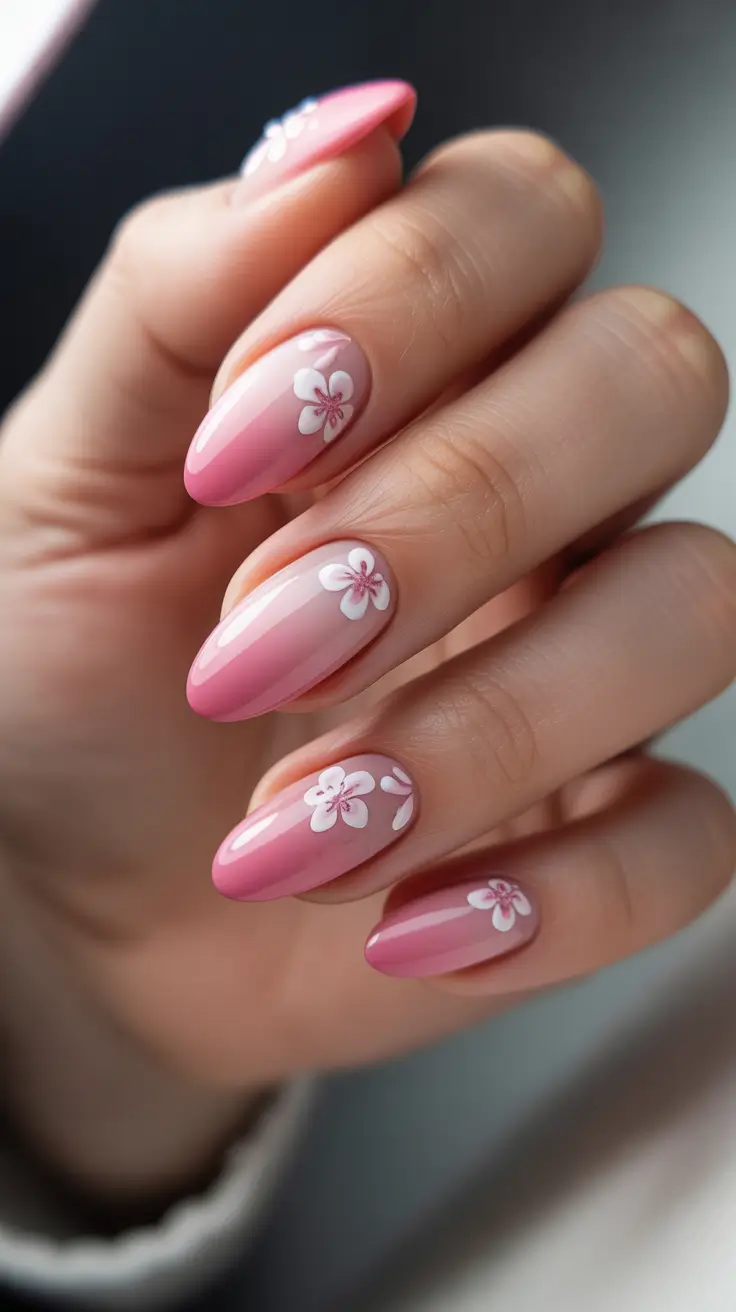
Milky Blush Square With A Sparkly Flower Accent
This is the manicure I’d pick when I want “clean girl” polish but with one little whisper of drama. The nails are a short, tidy square with a milky blush base that looks glossy and cushioned, almost like a sheer pink lip balm – and then there’s that accent nail: a delicate floral moment floating over a fine shimmer background. It’s giving pink spring nails short, pink spring nails simple, but still totally Inspo.
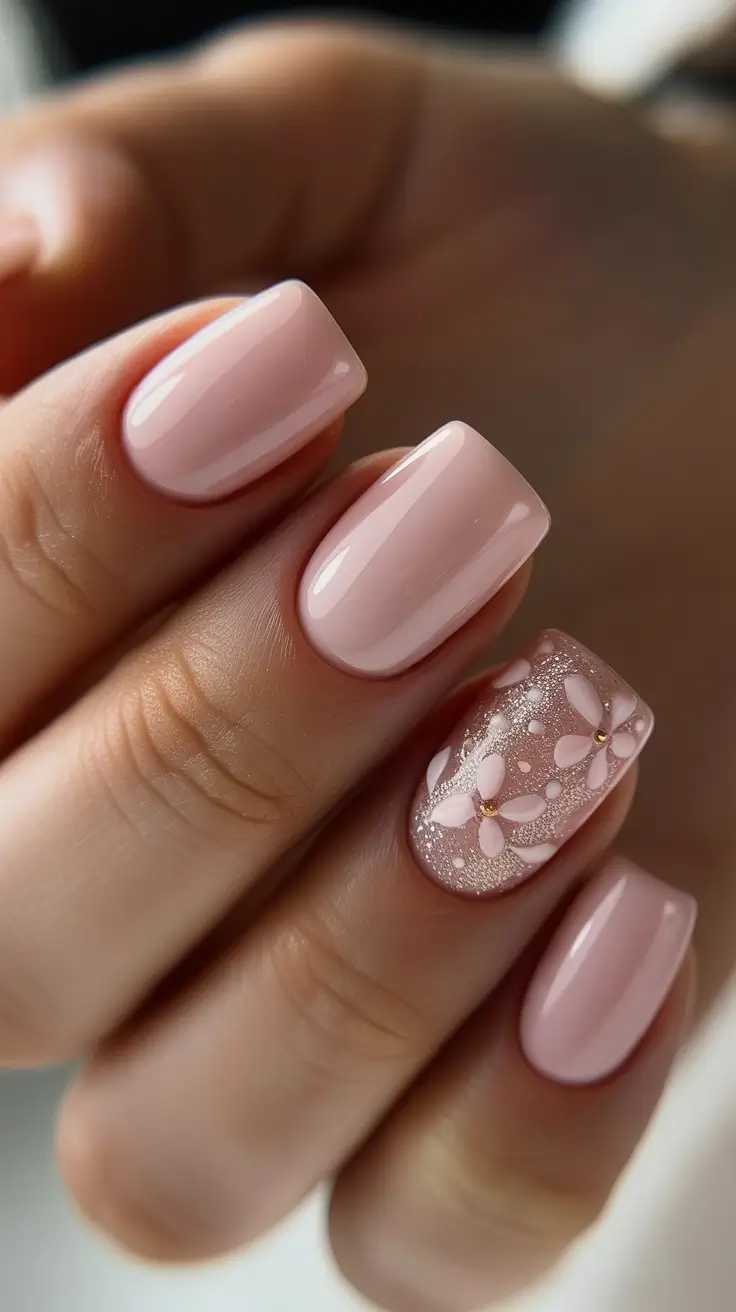
If I’m building this from scratch, I grab a sheer milky pink gel (think OPI Bubble Bath vibes, or any “cover pink” builder gel if you want more structure), plus a fine glitter gel for the accent. For the flower, I like using white gel paint and a dotting tool – and if you want that tiny gold center detail, a micro bead or gold foil flake makes it feel expensive. This is one of those pink spring nail ideas square looks where the product quality really shows in the shine.
At home, I’d do two thin coats of the milky pink, then top coat – cure fully so the base stays glassy. For the accent, apply shimmer gel, cure, then paint the petals with a thin liner brush, add a dot in the center, and seal with a thicker top coat so everything looks encapsulated. A small tip that saves the whole look – wipe the brush often so the petals stay crisp and not chalky, which is the fastest way florals can turn “crafty.”
Sheer Pink Almond With Daisy Confetti
Okay, this one feels like opening the windows on the first warm Saturday in April. The base is a soft, sheer pink – almost a jelly nude – and then the daisies are scattered like confetti across the nails, with tiny sunny centers that pop. It’s playful, flirty, and still wearable for work, which is why I always file it under pink spring nail ideas almond and pink spring nail ideas flowers.
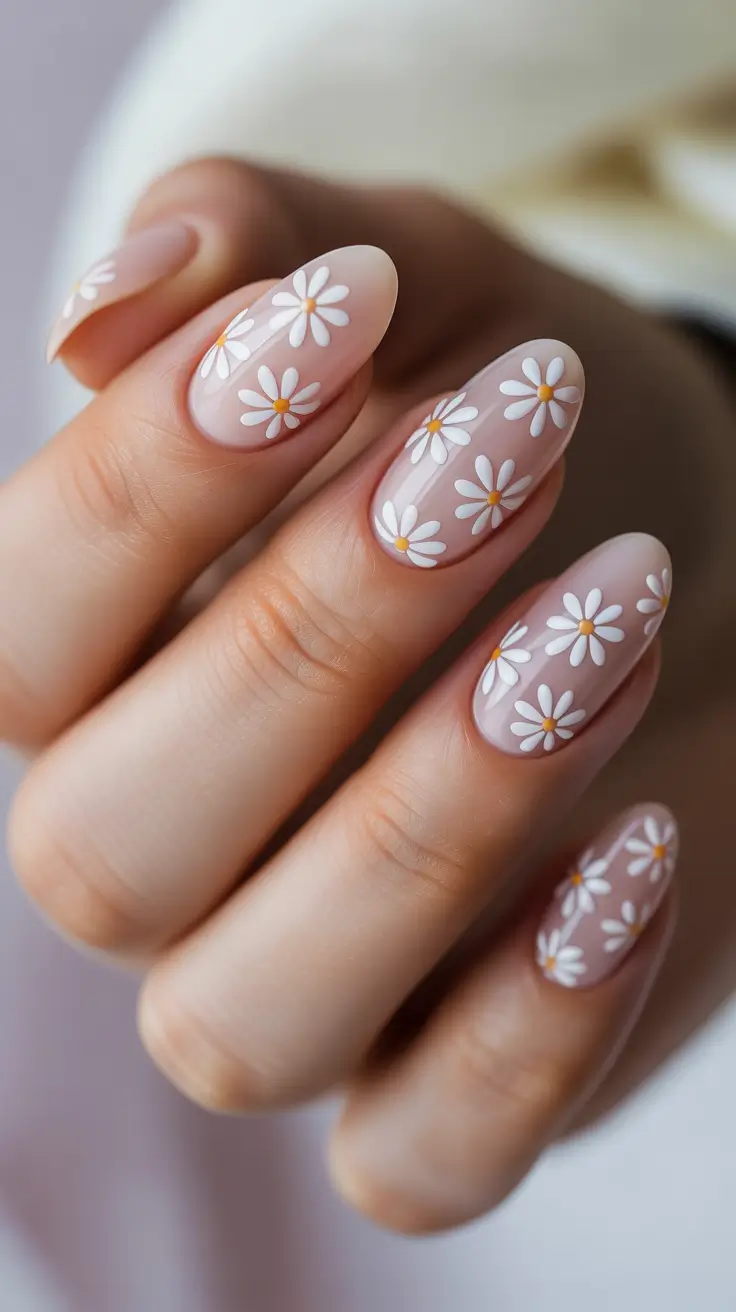
For materials, I’d keep it simple: a sheer pink gel (jelly nude or “ballet slipper”), opaque white gel paint for petals, and a warm Yellow dot for the centers. If you’re not in a freehand mood, nail stickers totally count – I’ve seen great daisy decals from Olive & June and other at-home friendly brands, and they look surprisingly pro once you top coat them.
The easiest DIY method is base color first, cure, then map out where you want each daisy before you commit. I do five quick petals with a dotting tool (dot – pull slightly – dot again), then a tiny center dot, and cure in between hands so I don’t smudge my own optimism. Finish with a glossy top coat, and don’t skip cap-sealing the tip – spring nails get wrecked by cleaning, gardening, and “just one quick Target run.”
Soft Mauve Pink With Minimal White Blossoms
This is the manicure I go for when I want flowers, but I also want to feel grown. The base leans mauve-pink – still spring, just a little moodier – and the white blossoms are placed with intention, not all over the nail. The petals have a soft, painterly look, with tiny dark centers and a subtle green flick that makes it feel like actual botanical Art.
I like using a creamy mauve gel polish here (something in that “dusty rose” family), white gel paint, a tiny bit of muted Green for the leaf detail, and a super fine liner brush. If you’ve ever felt intimidated by florals, this is where I tell you to relax – because the minimal placement makes it forgiving. It’s very pink spring nails design without shouting.
When I recreate it at home, I do the base, cure, then paint bigger petals in just a few strokes – you don’t need perfect symmetry for it to look pretty. Add the center dots last, then seal with top coat. The trick is to keep the brush pressure light so the petals look airy, not thick – almost like watercolor, but on your nails.
Honestly, this is one of my favorite “coffee date to dinner” manicures because it looks intentional even when my outfit is just jeans and a sweatshirt. If you’re craving Light spring energy but you’re not in a pastel mood, this one hits the sweet spot.
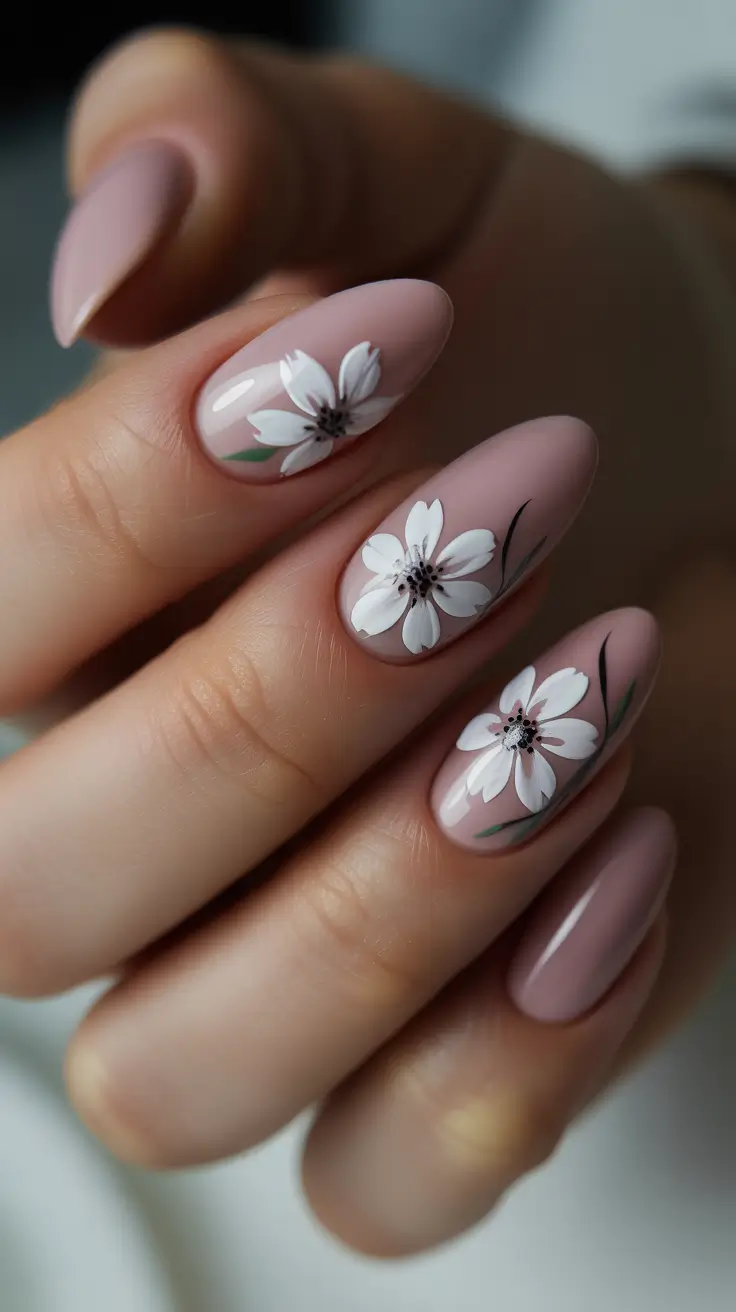
Glossy Pink Almond With Cherry Blossom Branch Details
This set feels like spring romance – the kind where you’re wearing a soft knit, your calendar is finally filling up, and you’re back to taking pictures of your hands holding drinks. The nails are glossy almond with a pale pink base, and the accent nails have delicate branch-like lines with clustered blossoms. It’s elegant, a little artsy, and definitely one of those pink spring nails acrylic looks you’d see on a “nails of the week” reel.
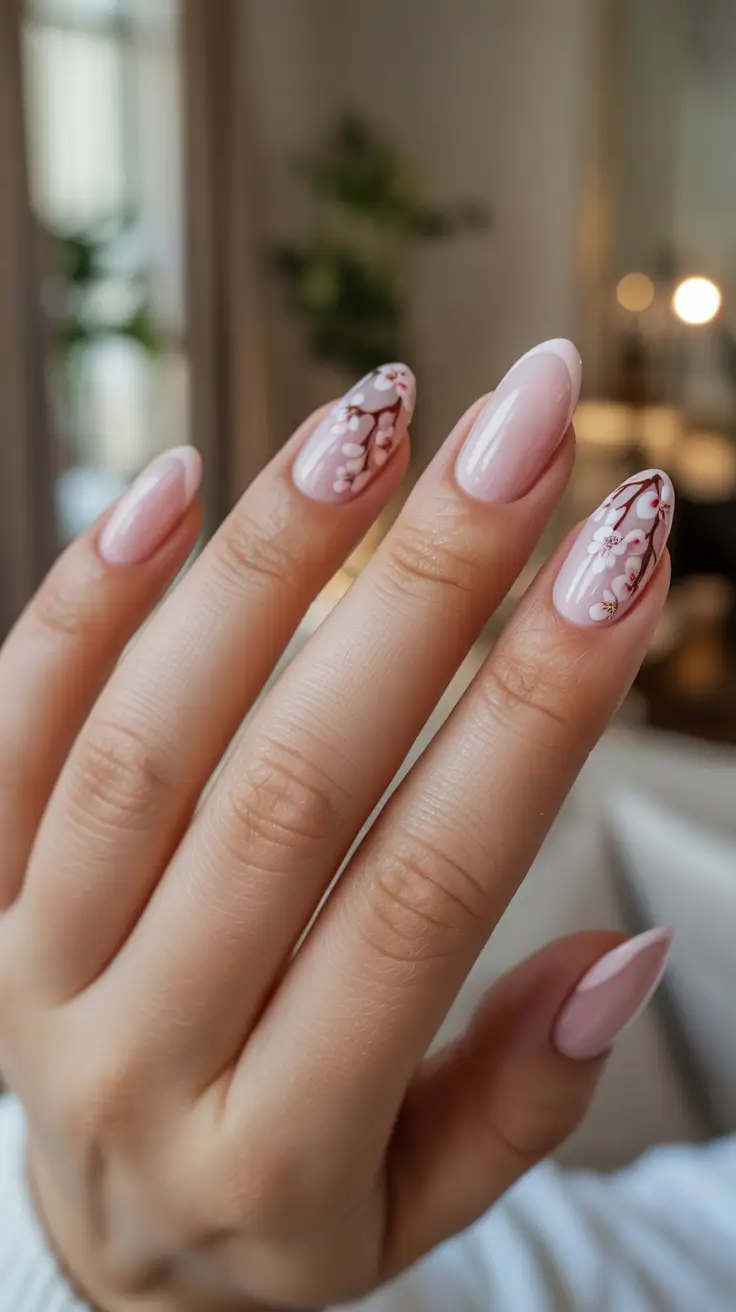
To do it, I’d use a sheer neutral pink (or a builder gel overlay if you want that smooth, structured salon finish), then a thin liner brush with a brown-rose gel for the branches. Blossoms are easiest with white gel paint, plus a tiny warm pink tint if you want dimension. A speck of metallic detail in the center makes it feel “jewelry-like” without going full Hot sparkle.
If you’re trying this at home, paint the branch first in one or two confident strokes – don’t overthink it. Then add blossoms where the line naturally wants to “bloom,” cure, and top coat. My personal rule: if the branch gets too thick, it starts looking like stripes, not botanicals – so I keep the brush almost dry and build slowly.
Pink Almond With Bubble Dot Gradient
This one is for the girlies who want something cute and modern, but not obviously floral. The base is a soft pink, and the tips fade into a cluster of dots – like bubbly confetti or tiny pearls. It feels sweet, slightly graphic, and super wearable, which is why I file it under pink spring nail ideas simple even though it still reads as a real Design choice.
For supplies, you basically need a sheer pink base, white gel paint (and optionally a lighter pink for dot dimension), plus a dotting tool or even the rounded end of a bobby pin. If you want the gradient effect to look intentional, use multiple dot sizes – big near the tip, smaller as they fade upward. It’s one of those pink spring nail ideas that looks harder than it is.
At home, I do the base, cure, then start dotting from the tip upward, spacing them like you’re sprinkling salt – not stacking them in a line. Cure, top coat, and you’re done. And if you mess up a dot, you can literally wipe that one dot off with a tiny bit of alcohol on a detail brush before curing – no dramatic redo required.
Milky Blush With Sketchy Floral Accent
Soft, glossy, and quietly expensive-looking – this is the kind of pink spring nails design I reach for when I want my nails to look “done” but still minimal. The base is a milky baby pink on a short, neat square shape, and then there’s one accent nail with black outline florals that feels like doodles on a cute notebook – clean lines, zero chaos. It’s giving “Sunday reset” energy, and it totally counts as pink spring nails short without feeling basic.
For polish, I’d go sheer and buildable: OPI Bubble Bath, Essie Ballet Slippers, or Gelish Simple Sheer are all reliable for that creamy blush. If you’re doing gel, a rubber base like Kodi or Beetles Builder Base helps keep short nails looking smooth and plump. For the floral Art, a fine liner brush plus a black gel paint (Makartt or Born Pretty) makes the outlines crisp without looking harsh.
At home, the trick is thin layers – seriously, don’t rush the pink. Two to three sheer coats look more luxe than one thick coat. Cure or dry fully, then sketch the flowers with a light hand, almost like you’re tracing, not “drawing.” Finish with a glossy top coat that self-levels (Seche Vive for regular polish, or Kokoist Ultra Glossy for gel) so the whole look feels like glass.
And honestly – this is my go-to when I can’t decide what to wear. It matches everything, it photographs beautifully, and it’s exactly the kind of pink spring nail ideas square moment that still feels artsy. If you’ve ever wanted pink spring nail ideas simple but not plain, this one is it – a tiny bit of Design, zero stress.
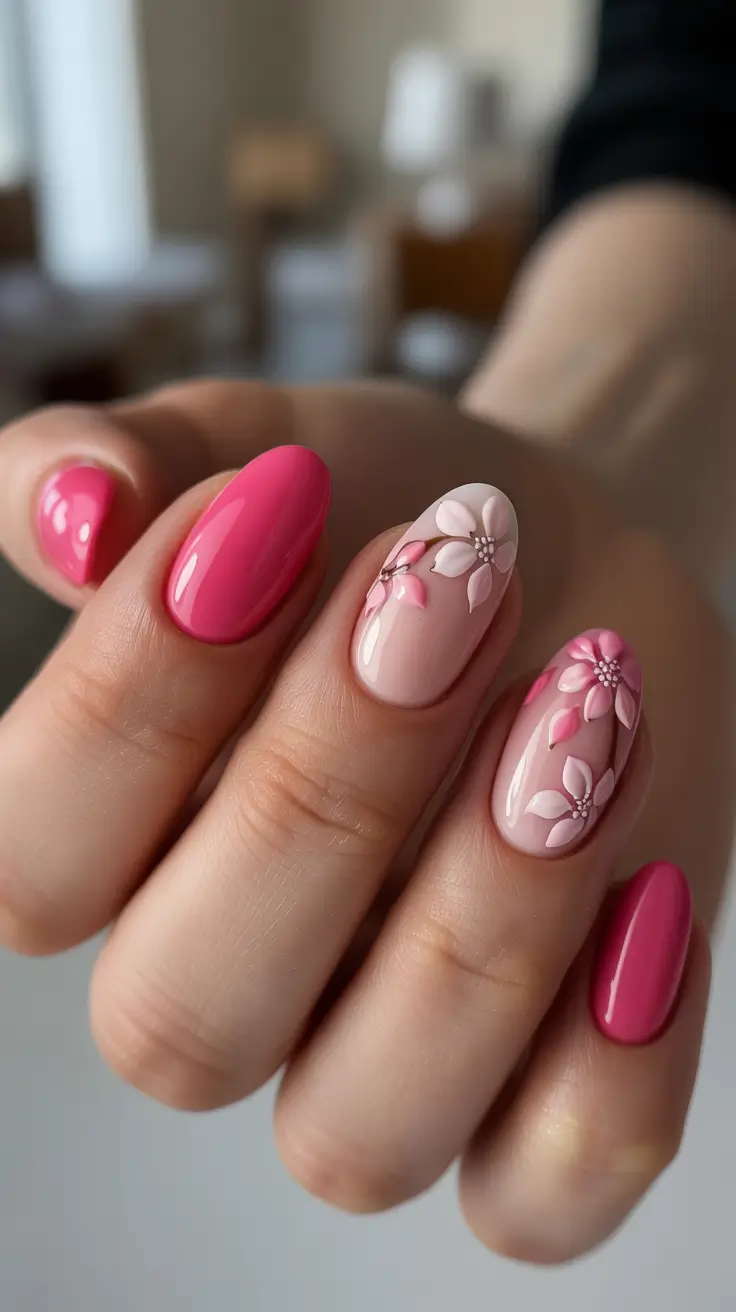
Petite Cherry Blossom Details On Short Pink
This one is spring romance in a neat, wearable package. The base stays a soft nude-pink, and the florals are small but dimensional-looking – white petals with pink centers and little green leaves, scattered across a few nails. It’s sweet without going full princess, and it nails that “fresh manicure, fresh mindset” vibe – pure pink spring nail ideas flowers energy.
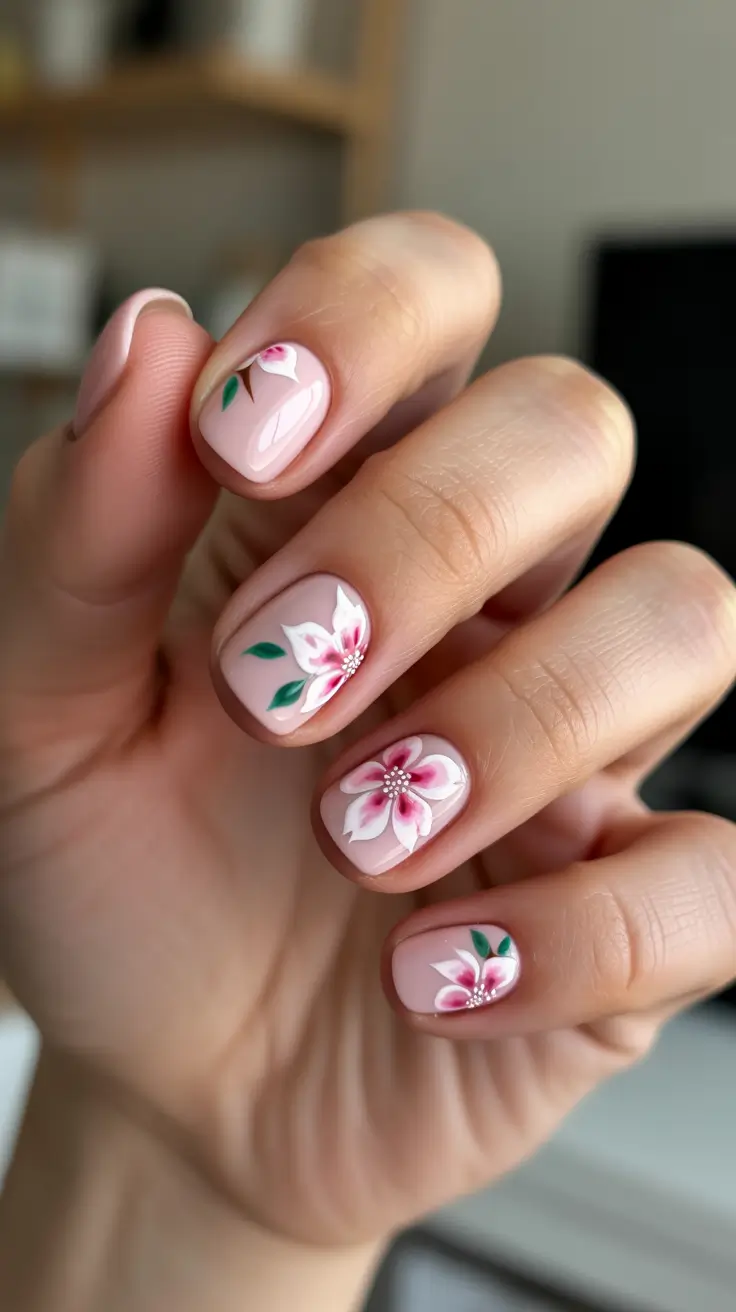
If you want the colors to look clean, keep the base neutral: OPI Put It In Neutral or Essie Mademoiselle work well. For the flowers, I like using white gel paint (Beetles or Born Pretty) so the petals stay opaque, plus a rosy pink dot in the center. A leaf green (think DND Green Leaf or any medium Green) makes it feel botanical instead of cartoonish.
My easiest method is dot-first, detail-second. I place five white dots in a circle, gently drag each dot inward with a thin brush to form petals, then add the pink center and tiny leaf strokes. The final top coat matters – a thick glossy layer makes the petals look “painted on” instead of textured, which keeps the whole thing looking salon-level.
I’d wear these when I’m craving compliments but still want something soft. They read feminine, they’re not loud, and they’re such a good “brunch to errands” set. Also, if you’ve been hunting for pink spring nails flowers that don’t take over your whole vibe, this is a very safe yes – Light, fresh, and super wearable for Short nails.
Hot Pink Pop With Botanical Flower Art
Okay, this one has personality. You’ve got a glossy nude base with bold, painterly flowers on a few nails, plus a bright hot pink on at least one nail that makes everything look intentional – like you planned the whole outfit around your manicure. It’s the kind of Inspo that makes you sit up straighter when you type. If you like contrast, this is your “I’m back outside” set.
To get that glossy, long-wear look, I’d do this in gel or pink spring nails acrylic if you want extra durability. For the nude base, Aprés “Heavenly” style nudes or a sheer gel like Gelish Simple Sheer works. For the bright accent, any true fuchsia gel (DND has a ton) gives that Hot punch. For the florals, you’ll want white, a deep pink, and two greens – one leafy, one darker for shading – so the petals don’t look flat.
The home version is surprisingly doable if you treat it like layering. Base first, then map the petals in white, then add pink shading toward the center, then dot the tiny center details. Leaves go last with a thin brush – quick strokes, and don’t overthink them. Seal everything with a thick top coat so it looks smooth and wearable, not “craft project.”
I love this for days when I’m bored of neutrals but not ready for neon everything. It feels like a confidence accessory – a little fashion moment you can’t lose. And if you’ve been saving pink spring nail ideas almond boards forever, this is the kind of bold-floral balance that makes those pins actually make sense in real life – Flowers, Design, and a splash of Green that feels modern.
Minimal Tulip Accent On Soft Almond Pink
This is the manicure I pick when I want calm, not chaos. A soft pink base on almond-shaped nails, and then one delicate tulip accent that looks like it belongs in a spring bouquet, not a sticker pack. It’s subtle, airy, and kind of emotional in the best way – the definition of pink spring nails simple with a single little statement.
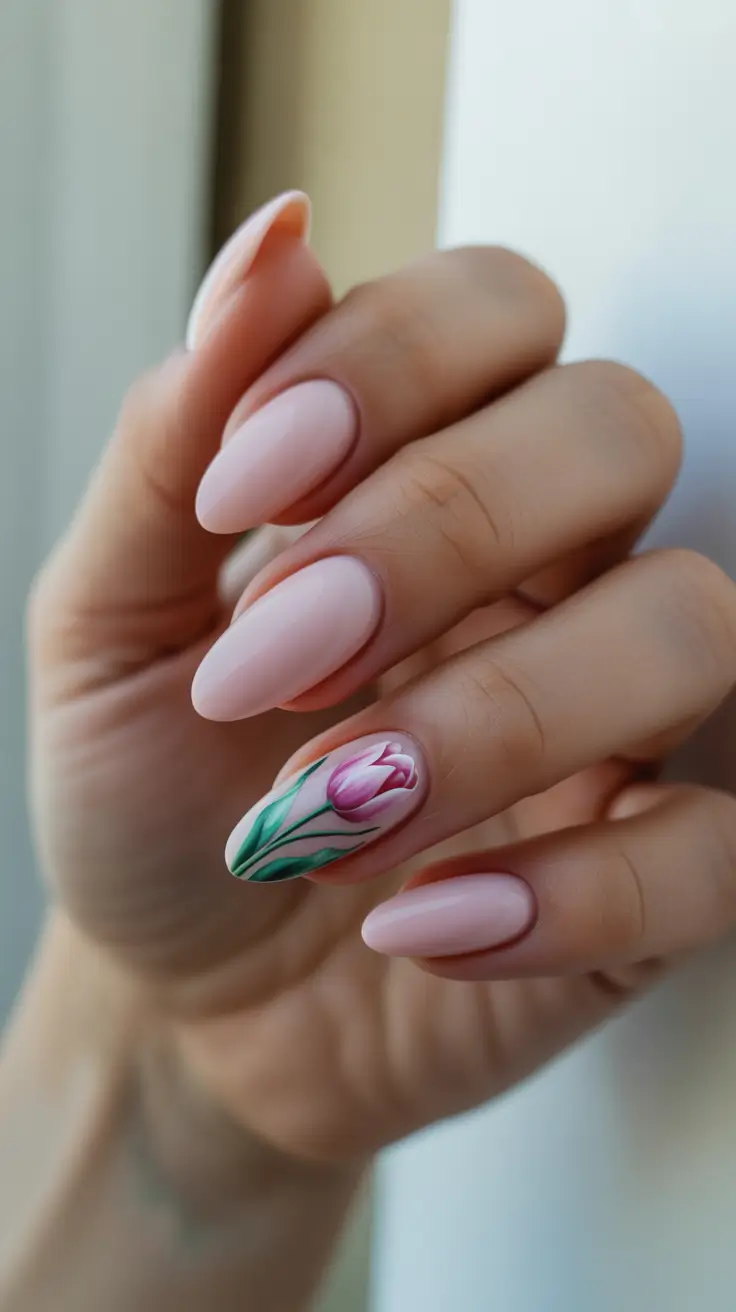
If you want it to look clean, pick a semi-sheer pink that doesn’t go chalky – OPI Bare My Soul, Essie Sugar Daddy, or a jelly gel pink. For the tulip, you’ll need a pink that’s slightly deeper than your base plus a leafy Green. A micro liner brush is the whole game here.
My favorite way to DIY this is to keep the tulip simple: one curved petal shape, a second smaller one, then a quick stem and leaf. Don’t try to “perfect” it – the charm is that it looks hand-painted. Finish with a glossy top coat so the accent looks embedded and not like it’s sitting on top.
I recommend this to anyone who’s nervous about nail art but still wants something seasonal. It’s basically a soft yes. Also, it’s the kind of pink spring nail ideas simple look that makes your hands look elegant, even if you’re just holding a to-go latte and answering emails. Quiet Art, maximum payoff.
Glossy Pink Almond With Daisy Confetti Accent
If spring had a signature manicure, it would be this. A glossy, translucent baby pink on almond nails, plus one accent nail sprinkled with little daisies – white petals, tiny pink centers, and that “fresh air” vibe that makes everything feel lighter. It’s romantic, but still clean – very “new season, new mood” and so on-theme for pink spring nails design.
Materials-wise, I’d use a sheer gel pink (jelly-style) so the nails look plump and natural, not painted-on. For daisies, white gel paint plus a dotting tool is enough. If you’re not into hand-painting, daisy decals work too – just seal them under two layers of top coat so they don’t catch on hair or sweaters.
Here’s my low-effort method: do your base, fully cure, then add daisy petals with a dotting tool – five dots in a circle, then lightly nudge them inward so they look petal-shaped. Add a pink dot in the center, cure again, then top coat. Nail artists always say prep is everything, and I agree – clean cuticles and a smooth base make even simple daisies look elevated.
This one is pure Light energy. I wear something like this when I want my nails to feel pretty but not “too much” – like a soft filter for real life. If you’re collecting pink spring nail ideas flowers, save this one. It’s Flowers and Art, but still totally appropriate for work, weekends, and everything in between.
Lavender Garden Florals On A Soft Pink Base
This set is the definition of delicate-but-not-boring – a creamy, sheer pink base with medium almond length, then hand-painted lavender blossoms that feel almost 3D because of the shading. The petals lean lilac with soft white highlights, the centers are a punchy Yellow, and the leafy accents add that fresh Green pop that screams spring. If you’ve been collecting pink spring nail ideas flowers, this is the kind of pink spring nails design that instantly looks “done” even with a simple outfit.
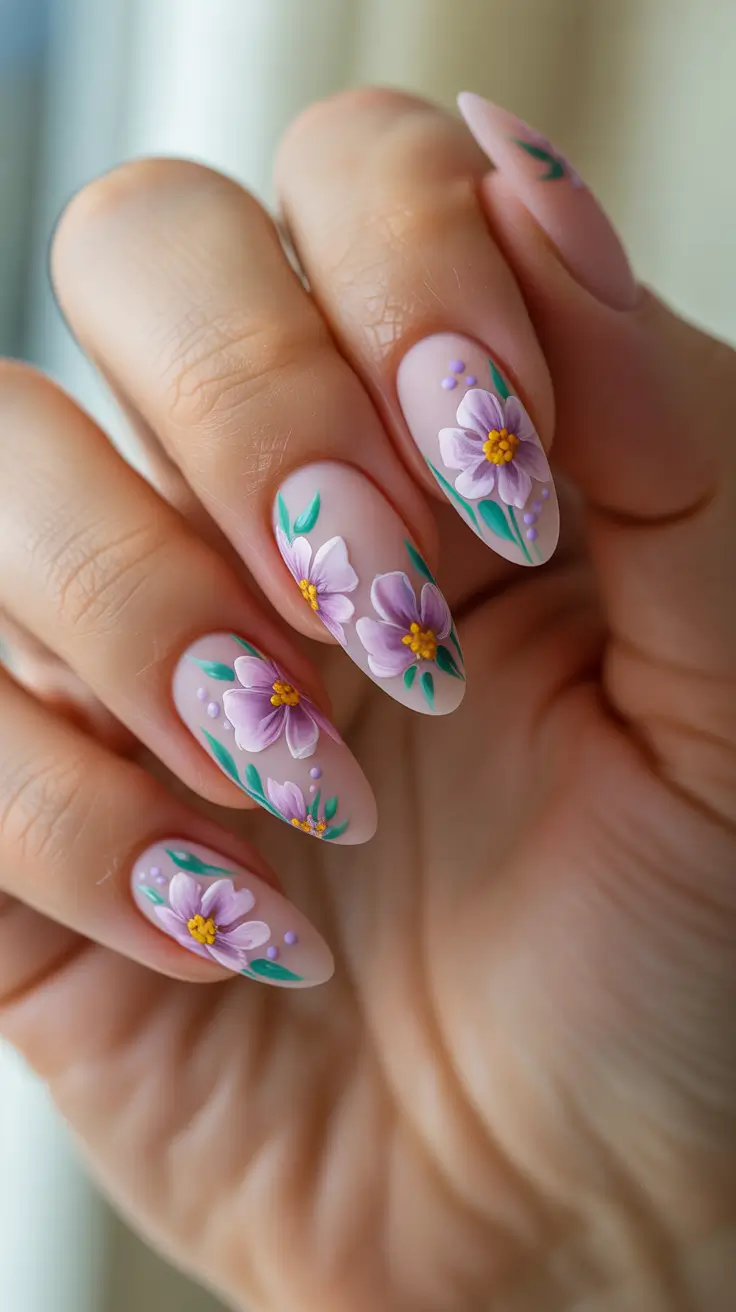
For materials, I’d reach for a sheer blush builder gel or a milky nude gel polish for the base, plus white and lilac gel paints for the petals. The centers are easiest with a dotting tool – one warm yellow gel shade, maybe a slightly deeper golden tone for dimension. For the leaves, a couple green gels (one lighter, one deeper) make the tiny strokes look intentional, and those little lavender dots can be done with a small dotting tool or even the head of a pin.
At home, I’d start with the base color in two thin coats and cure fully, then sketch the flower placement lightly with a fine liner brush so nothing ends up crowded. Petals go first (build the lilac shape, then add white highlight strokes), then the yellow centers, then leaf flicks, then dotted accents. Seal with a glossy top coat – and here’s my real-life tip – float the top coat instead of pressing it down so you don’t drag the Art details.
My favorite thing about this look is how it feels sweet and grown at the same time. It’s very pink spring nails flowers, but the cool lavender tone keeps it fresh – like you’re wearing spring without going full pastel overload.
Pink Ombre Almond With Tiny Blossom Accents
This one feels like a soft sunset manicure – a smooth ombre that melts from a sheer nude-pink near the cuticle into a deeper rosy pink toward the tips. The almond shape makes the gradient look extra elegant, and those tiny white blossoms add just enough detail to make it feel special without being busy. If you want pink spring nails simple but still want that “people will ask where you got them done” vibe, this is it.
For supplies, I’d keep it minimal: a sheer pink base gel, a medium rosy pink for the gradient, and opaque white for the flowers. You can do the blossoms with gel paint and a micro brush, or use decals if you’re not in a freehand mood – either way, once you top coat, it reads super polished. This is one of those pink spring nail ideas simple looks where the blend matters more than the detail.
To DIY it, I blend the pink using a small makeup sponge or an ombre brush – tap the color from the tip upward in thin layers, curing between layers so the fade stays soft instead of streaky. After that, add the small blossoms (five petals, then a tiny center dot), cure, and finish with a high-gloss top coat. Slow down on the top coat step – a smooth, glassy finish is what makes this gradient look expensive and Light.
Personally, I love this for weeks when I’m bouncing between errands, meetings, and last-minute dinner plans. It’s calm, pretty, and wearable – the kind of pink spring nails that goes with everything and still feels like a fresh reset.
Hot Pink Pop With Daisy Burst Feature Nails
Not gonna lie – this one is for when you want your nails to do the talking. Two nails are a saturated Hot pink glossy finish, while the feature nails bring in a softer nude base topped with daisy-burst florals in white and bright pink, finished with tiny sparkly centers. The contrast is what makes it feel modern – bold color on the sides, playful Flowers in the middle, and a clean almond shape to keep everything sleek.
If I’m recreating it, I use a highly pigmented hot pink gel (the one-coat kind if possible), a nude-pink base for the feature nails, and opaque white plus a brighter pink gel paint for the petals. For the sparkle centers, rhinestones or crystal pixie dots work – or you can keep it simpler with metallic gel dots. This is pure Inspo if you love punchy color but still want something detailed.
At home, I’d paint the hot pink nails first because they’re the easiest win – two thin coats, cure, then top coat. For the feature nails, base first, then map the flower bursts with a liner brush, alternating white and pink strokes so they look layered, then add the center gem with a dab of rhinestone glue gel. Seal carefully around the gems with top coat – don’t flood them, just outline, cure, then add a final thin coat.
This is one of my go-to mood-boost sets because it feels like spring energy with a little extra confidence. If you’ve been saving pink spring nail ideas and want something that’s still cute but definitely not shy, this one checks every box.
Soft Pink With Purple Feather Brushstroke Art
This manicure is quiet, airy, and artsy in a way that feels very 2026. Most nails are a glossy baby pink, clean and simple, but two feature nails switch to a soft white base with purple feather-like brushstrokes that look hand-painted and slightly translucent. It’s giving modern watercolor – delicate but intentional – and it’s a gorgeous alternative if you want pink spring nails without going floral.
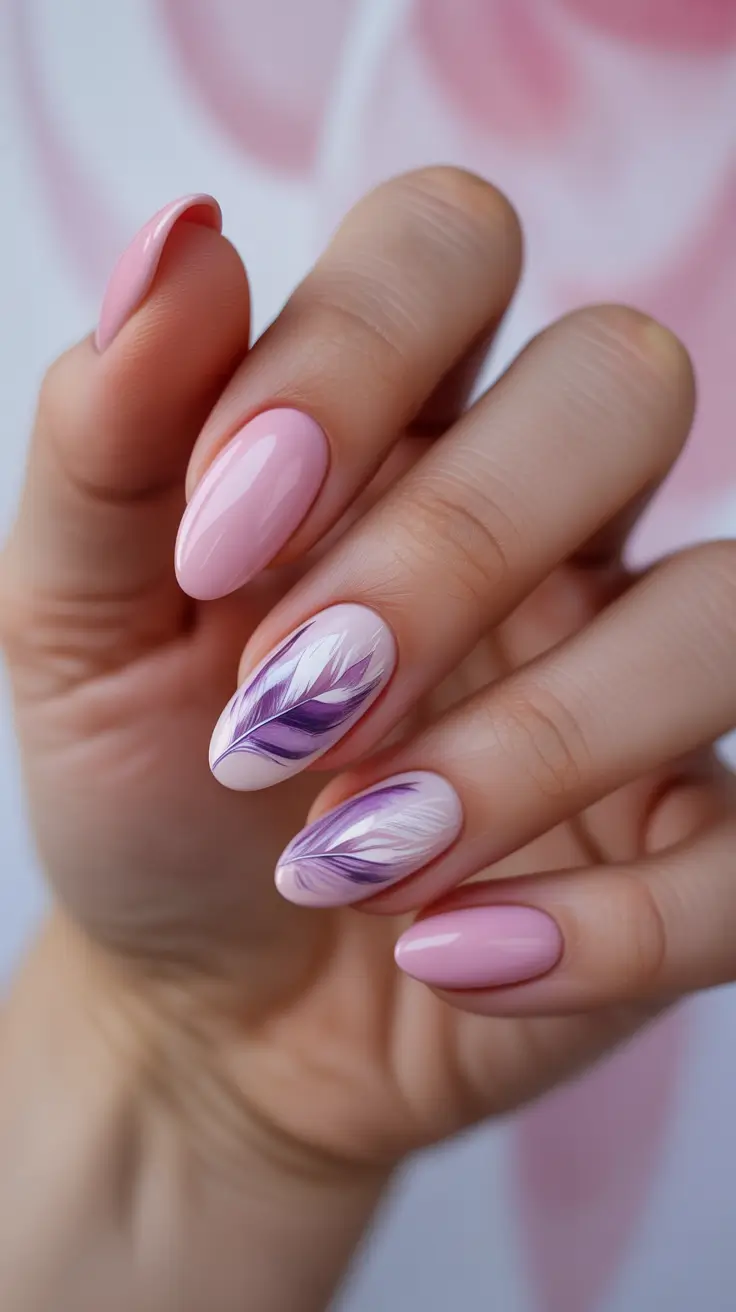
For materials, I’d grab a milky pastel pink gel for the solids, a creamy white gel for the accent base, and two purples (one deeper, one softer lilac) to create the feather gradient. A thin liner brush and a soft, flat detail brush help a lot here – this look relies on light strokes, not heavy lines, so the tools matter.
DIY steps are actually simpler than they look: paint and cure the base colors first, then on the accent nails, pull thin purple strokes from one side toward the center like you’re sketching a feather. Add a few lighter strokes on top to create dimension, cure, then seal with glossy top coat. The key is to keep your brush pressure low – you want “whispery” strokes, not thick stripes, so the Art feels airy.
I love this one for the weeks when spring feels a little moody – rainy mornings, cozy sweaters, but you still want something fresh. It’s a softer kind of Design, and it looks stunning when your hands are wrapped around a warm cup of coffee.
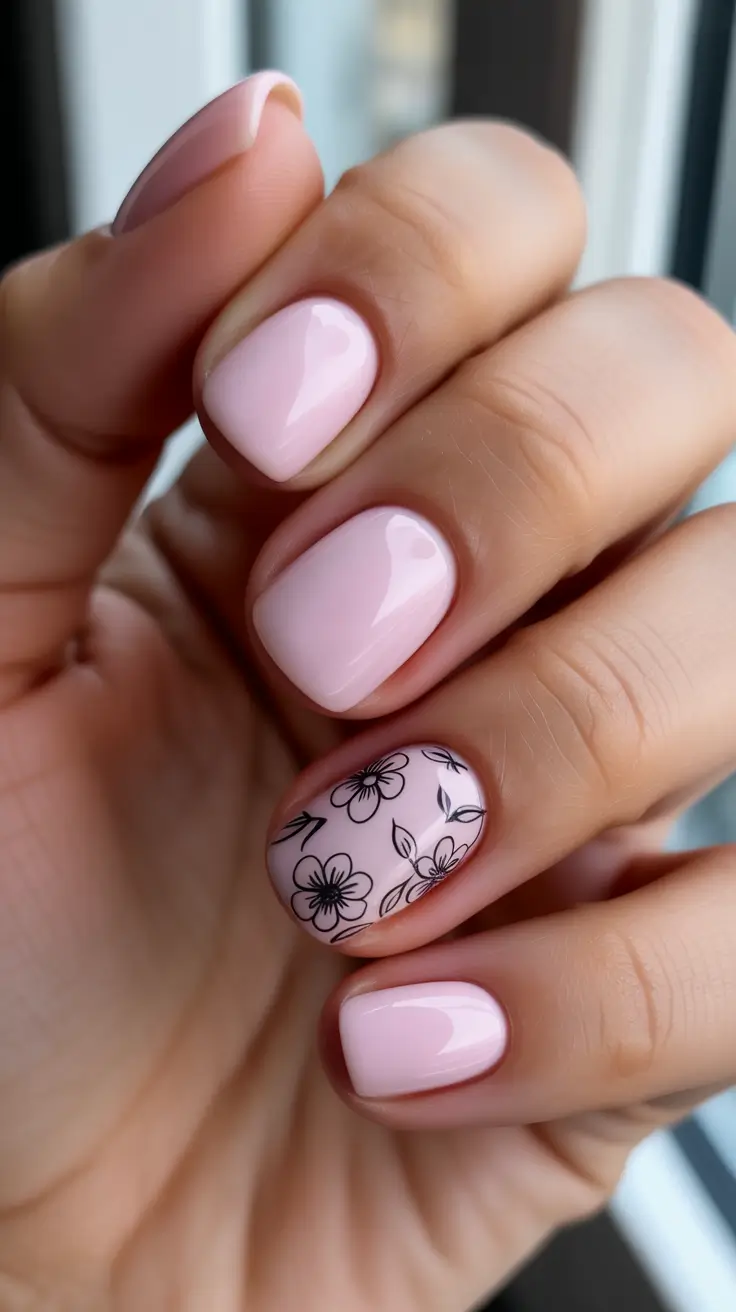
Minimal Pink With Graphic Line-Flower Accent Nails
This set is minimal spring with a tiny edge – a soft, glossy pale pink on most nails, then two accent nails with a crisp white base and graphic line-drawn flowers. The petals are outlined in fine black lines with a blush tint inside, plus a few dot details that make it feel modern and clean. If you like pink spring nails simple but want a little “cool girl” energy, this hits perfectly.
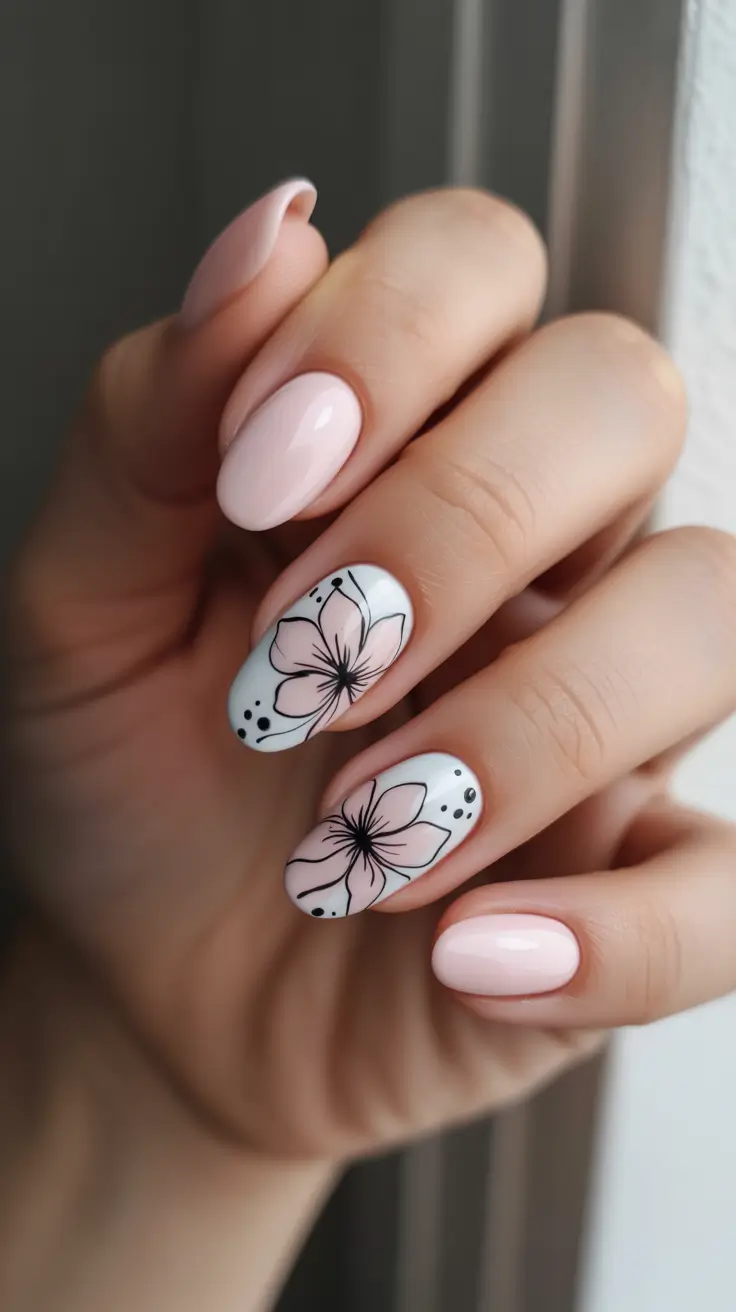
To create it, I’d use a soft milky pink gel for the solids, an opaque white gel for the accent base, black striping gel or very thin black gel paint for the outline, and a sheer blush pink to tint the petals. A liner brush is non-negotiable here – the charm of this look is how clean and intentional the lines are, even though the vibe stays playful.
At home, I paint the pink nails first and finish them glossy, then focus on the accents: white base, cure, outline the flower with fine lines, add the blush tint inside the petals, then finish with a few dot accents for balance. Top coat last, and I always recommend doing a slightly thicker top coat over line art so it looks smooth and sealed – no texture, no snagging.
This is the manicure I’d wear when I want something that works for everything – casual jeans, a blazer, a dressy night out – and still feels like spring. It’s simple, chic, and the kind of pink spring nails idea that never looks out of place.
Hot Pink Butterfly Moment With A Citrus Pop
This set is unapologetically bright – glossy fuchsia on short, softly squared nails, with two accent nails featuring airy butterfly wing art in crisp white linework and a punch of Yellow in the center. It’s playful but still clean, like the grown-up version of sticker nostalgia. If you want Hot pink spring nails that instantly look like you planned your whole week around them, this is the vibe.
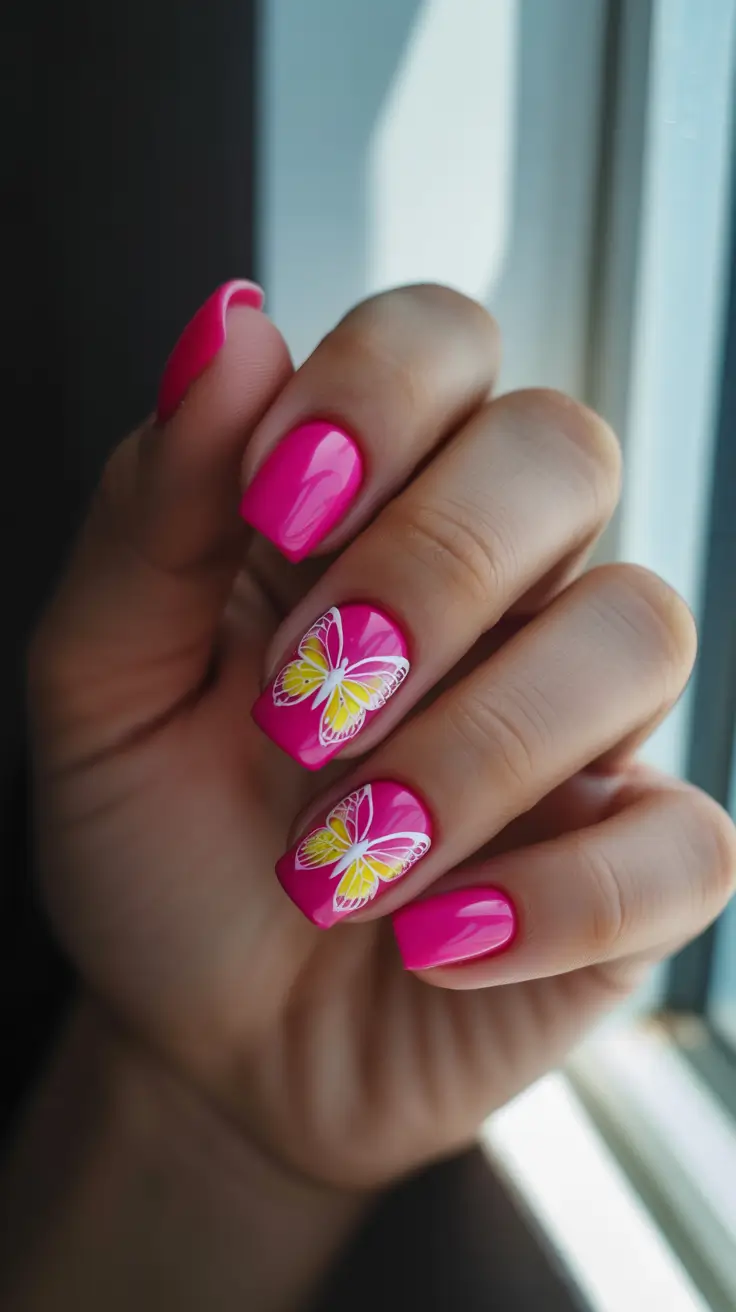
For products, I’d grab a true fuchsia gel (DND, Kiara Sky, or Beetles all have good options), plus an opaque white gel paint for the butterfly lines. The yellow can be a small-detail gel pot or even a nail art marker if you’re careful. A thin liner brush and a dotting tool make the Art look sharp instead of shaky.
At home, I do it in this order – base color first, fully cured, then map the butterfly wings lightly in white, almost like you’re sketching. After that, fill the inner wing area with a soft yellow gradient (a tiny sponge works) and seal with a thick glossy top coat so the whole Design looks embedded, not raised.
I love this as a mood-lifter manicure – like a mini vacation for your hands. And if you’ve been collecting pink spring nail ideas square, consider this your sign to actually wear them instead of just saving them. Low effort to wear, high impact to look at.
Sky Blue Accent With Pink Floral Tiles
This look is basically spring in a color palette – a milky pink base paired with cool Blue and two statement nails that look like hand-painted floral tiles. The accent nails mix soft pink petals with airy blue strokes, and it feels fresh in a “windows open, laundry done” kind of way. It’s a sweet twist on pink spring nails design without going too sugary.
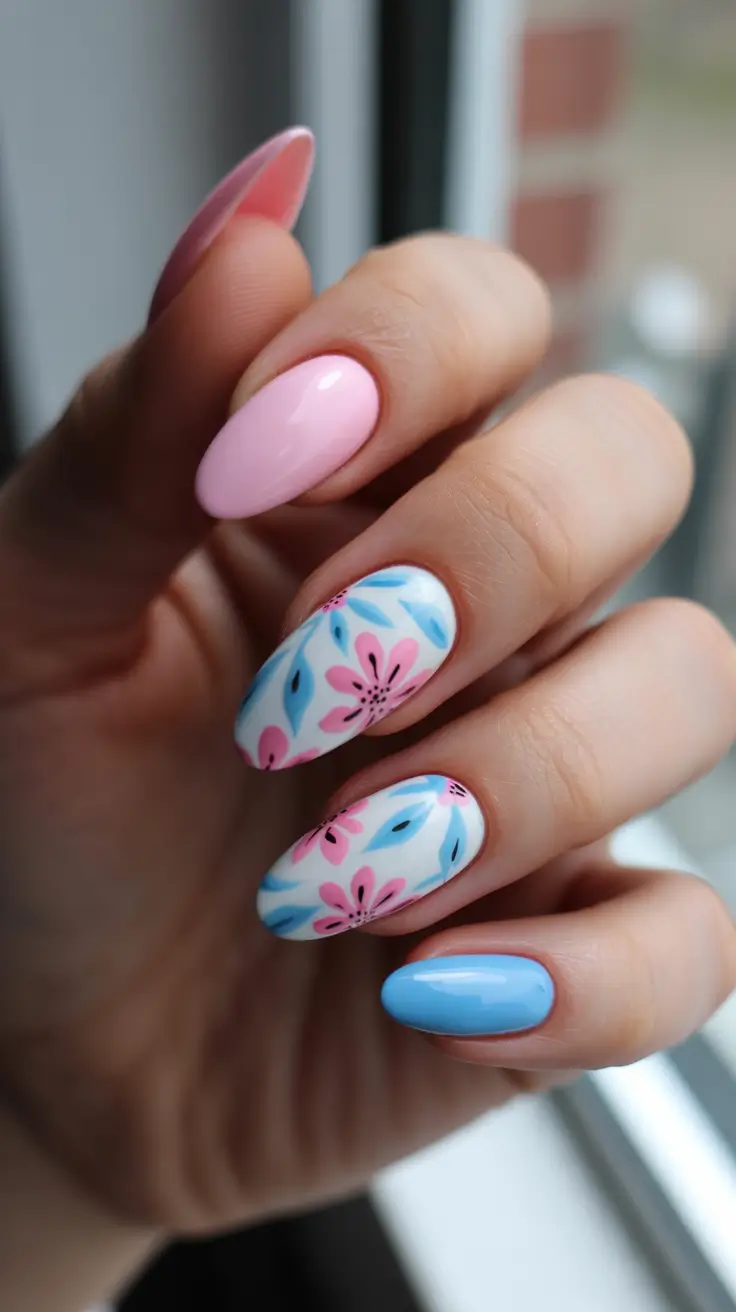
I’d use a sheer blush pink (Essie Mademoiselle or OPI Bubble Bath vibes), a creamy baby blue for the solid nail, and an opaque white base for the art nails so the colors stay bright. For the floral details, you need two pinks (one medium, one lighter for highlights) and a couple of blues for those petal-like swooshes. A small petal brush is nice, but a fine liner works too.
When I DIY something like this, I keep it simple – paint the white base, cure, add the blue strokes first (so the layout feels balanced), then drop in the pink flowers with a few dot-details in the centers. The secret is spacing – leave a little breathing room so the pattern looks intentional and not crowded. Finish with a glossy top coat, and you’ve got instant Inspo.
This is the manicure I’d wear when I want something cute but not loud – like it matches denim, linen, and “soft makeup” days. If you’ve been hunting pink spring nail ideas almond with a fun color cameo, that one Blue nail is such a smart move.
Matte Fuchsia With Soft Nude Flower Overlays
Now this is drama – but make it spring. The long almond shape leans bold, the matte fuchsia nails feel modern and velvety, and the two nude accent nails are covered in layered floral petals in pink and white, with tiny gem-like sparkle near the cuticle. It’s giving “special occasion,” but you could totally wear it on a random Tuesday just to feel powerful – Hot pink spring nails acrylic energy.

To recreate it, I’d use an acrylic or builder gel base if you want that length to stay strong. Pick a saturated fuchsia gel, then top it with a matte top coat (no-wipe matte gels make this easy). For the floral accents, you’ll need a nude base, white gel paint, and a couple pink shades for dimension, plus tiny rhinestones or caviar beads if you want that little sparkle moment.
My DIY approach – do the nude base on the accent nails first, cure, then layer petals from light to deeper pink. I keep each petal slightly transparent at the edges so it looks soft, not cartoonish. Add the tiny gems last with a wax pencil, then seal everything with glossy top coat on the art nails while keeping the fuchsia nails matte – that contrast is the whole point of the Design.
I’m obsessed with how this manicure mixes “editorial” and “romantic.” If you want Flowers that feel grown-up, the matte plus nude combo is such a cheat code – you get maximum Art without it looking busy.
Soft Blush With Creamy Yellow Garden Blooms
This one feels like gentle spring – a glossy blush base on short oval nails, with two accent nails featuring raised-looking florals and delicate leafy strokes. One flower reads creamy butter-yellow with a warm center, and another looks like a soft white-lilac bloom – the whole thing is subtle, sweet, and quietly detailed. It’s very Light and wearable, but still clearly Flowers.
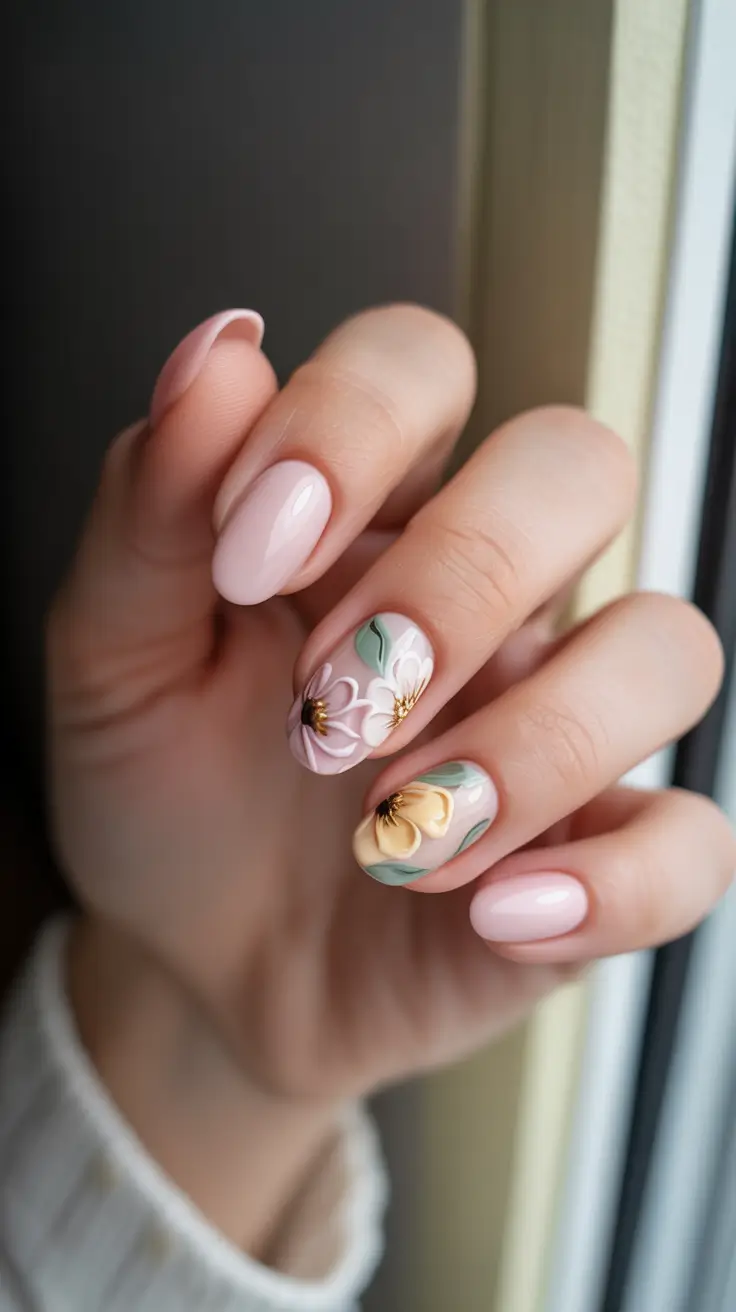
For colors, I’d choose a sheer blush pink base, a creamy Yellow, a muted white, and a sage-leaning Green for the leaves. If you want that slightly dimensional petal look, a thicker gel paint helps, or you can do two passes of petals and cure between them.
At home, I’d paint the base first, then build the flowers in layers – outline the petal shape, fill it, then add a tiny shadow stroke near the base of each petal for depth. Leaves are quickest with a single press-and-pull motion using a liner brush. Seal with a glossy top coat to smooth everything down and make it look intentional.
This is the manicure I recommend when you want something “pretty” but not attention-grabbing. It’s soft, it’s cozy, it makes your hands look polished even if your life is chaos. And that pop of Yellow feels like sunshine without being loud.
Classic Pink With Vintage Rose Accent Nails
These are the kind of pink spring nails that feel timeless – glossy baby pink on most nails, and then two creamy white accent nails with dusty rose artwork and soft olive leaves. The roses look hand-painted and slightly vintage, like floral stationery. It’s romantic, but still clean enough to wear to work without anyone side-eyeing you.
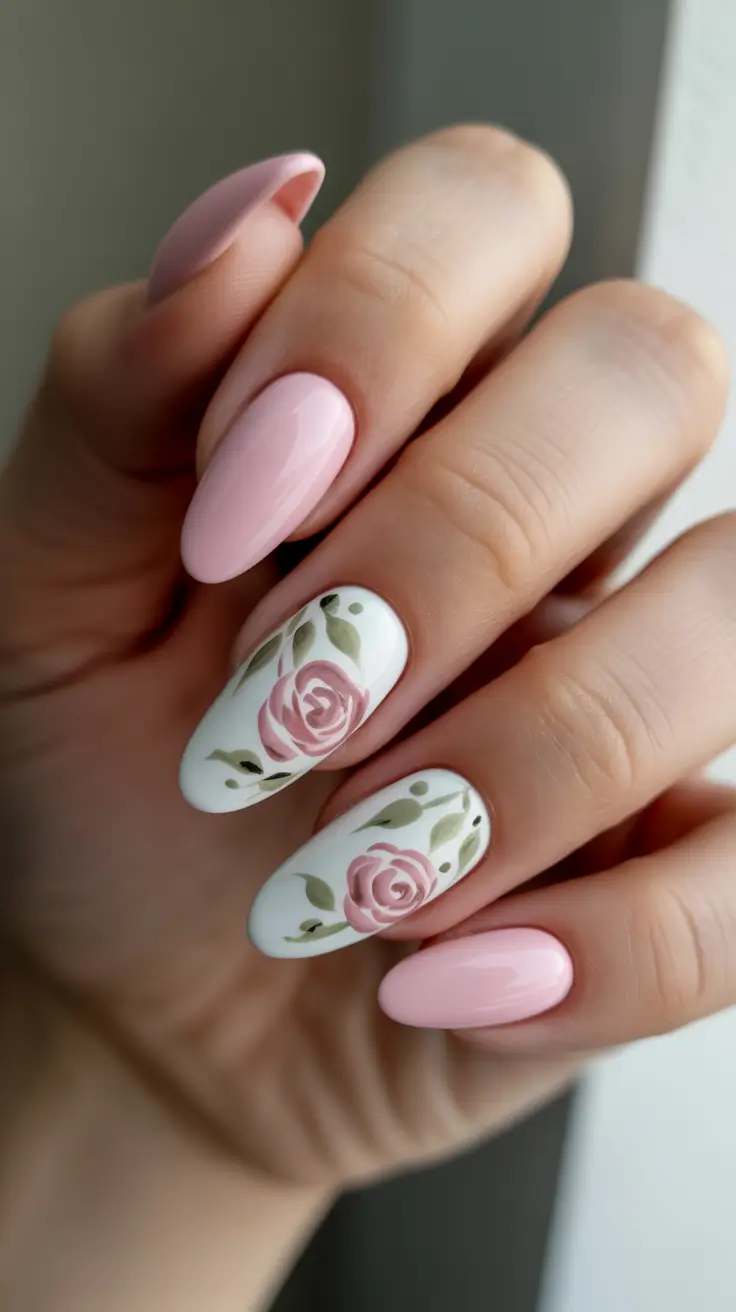
I’d use a pale pink gel for the solid nails, an opaque soft white for the accent base, and then two rose tones (one medium mauve-pink, one lighter blush for highlights). For the leaves, pick two greens – a muted Green and a slightly deeper olive for shadows – so they don’t look flat.
If you’re doing it at home, here’s the easiest rose shortcut – start with a small spiral stroke for the center, then add curved “C” strokes around it to build petals outward. It doesn’t need to be perfect – roses look better when they’re slightly irregular. Finish with a glossy top coat so the Art looks like it’s under glass.
I love this for anyone who wants pink spring nails flowers without going full daisy-doodle. It feels mature, soft, and kind of expensive-looking – like you have your life together, even if you absolutely do not.
Pink To Green Ombré Tips With A Single Blossom
This is a fresh twist – a sheer pink base that fades into Green tips, like a spring gradient French, plus one accent nail with a soft pink flower and a bright Yellow center. The shape is almond, the finish is glossy, and the whole look screams “new season energy.” If you’re bored of plain pink but not ready for neon chaos, this is such good Inspo.
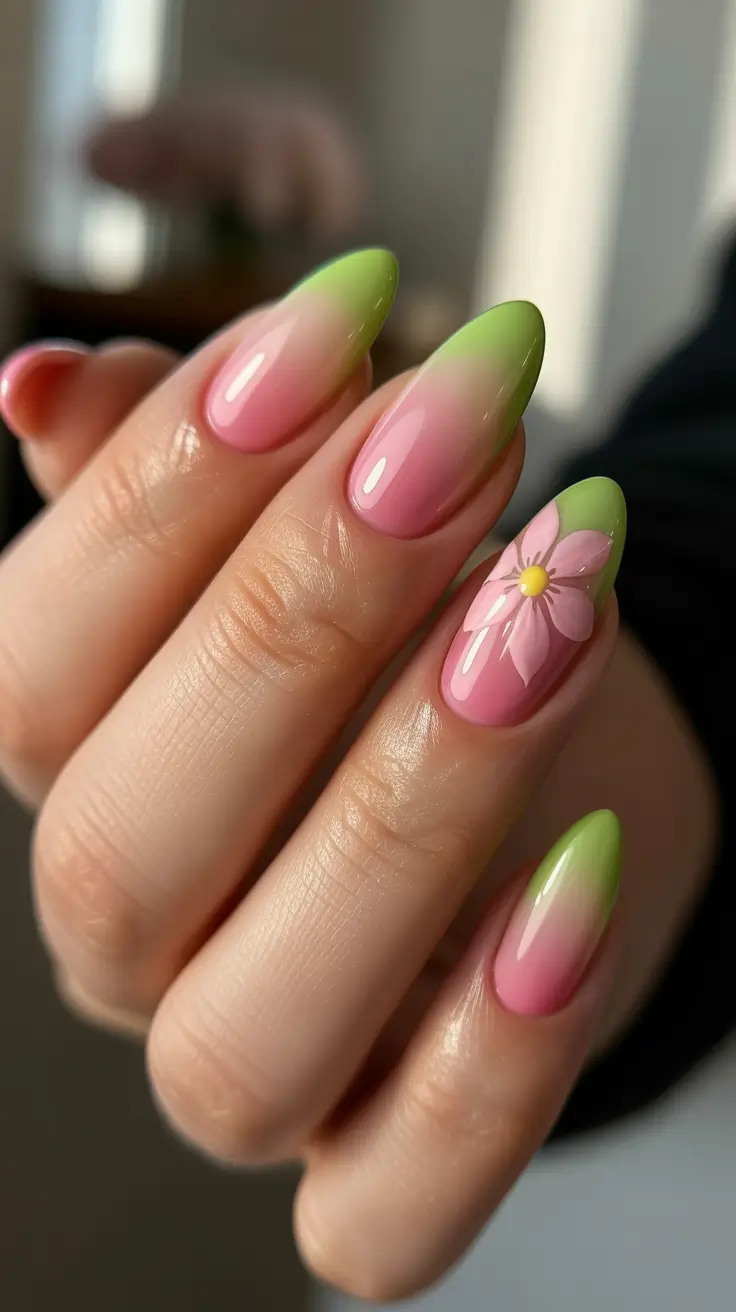
You’ll want a sheer rosy pink, a spring green that isn’t too dark, and a makeup sponge for the gradient. For the flower, grab a light pink and a dotting tool for the center. A milky builder base helps the nails look smooth and slightly plump, which makes the gradient look more expensive.
My steps – apply the pink base, cure, then sponge the green onto just the tips in two to three light passes, curing between if you’re using gel. Keep the sponge almost dry so the fade stays airy. Add the flower last – five petal strokes, then one dot of yellow in the center – and seal with a glossy top coat to blend everything together.
I’m not kidding – this manicure makes me feel like I should buy tulips and clean my apartment. The Green tip is unexpected, and that’s what makes it fun. If you’re collecting pink spring nail ideas almond, this is a top-tier “different but still pretty” option.
Deep Pink Solids With Soft 3D Floral Accents
This set is for the girlies who like pink with a little more attitude. Most nails are a rich rosy pink, glossy and bold, and then two accent nails go nude with sculpted-looking floral petals in pale pink, plus tiny bead details that add texture without going overboard. It’s romantic, but with structure – very intentional Design.
To recreate it, I’d use a deep rose gel for the solid nails and a nude-pink base for the accents. The flowers look best with thicker gel paint or 3D gel so the petals have that slight lift. Add tiny microbeads or a few small rhinestones if you want the center to sparkle subtly.
At home, I’d paint the solid nails first to lock the vibe in, then do the accent nails – map the petals in pale pink, cure, add a second layer only in the center of each petal to create dimension, cure again. Pop the beads on with a dot of clear gel, then top coat. Keep the top coat controlled so you don’t drown the petal shape.
This is one of those sets that gets compliments from strangers – it’s just bold enough to be noticed, but still classy. If you love Flowers but want them to feel a bit more “done,” this is the kind of Art that looks salon-fresh for days.
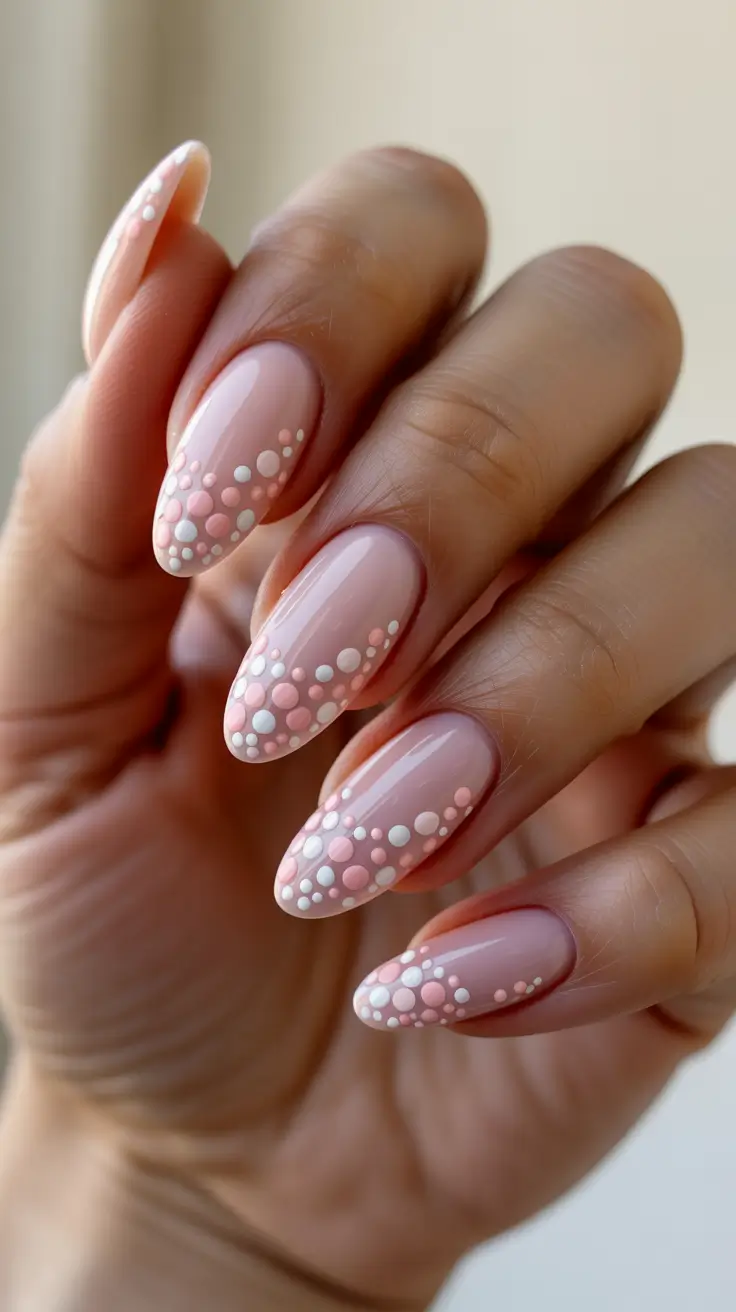
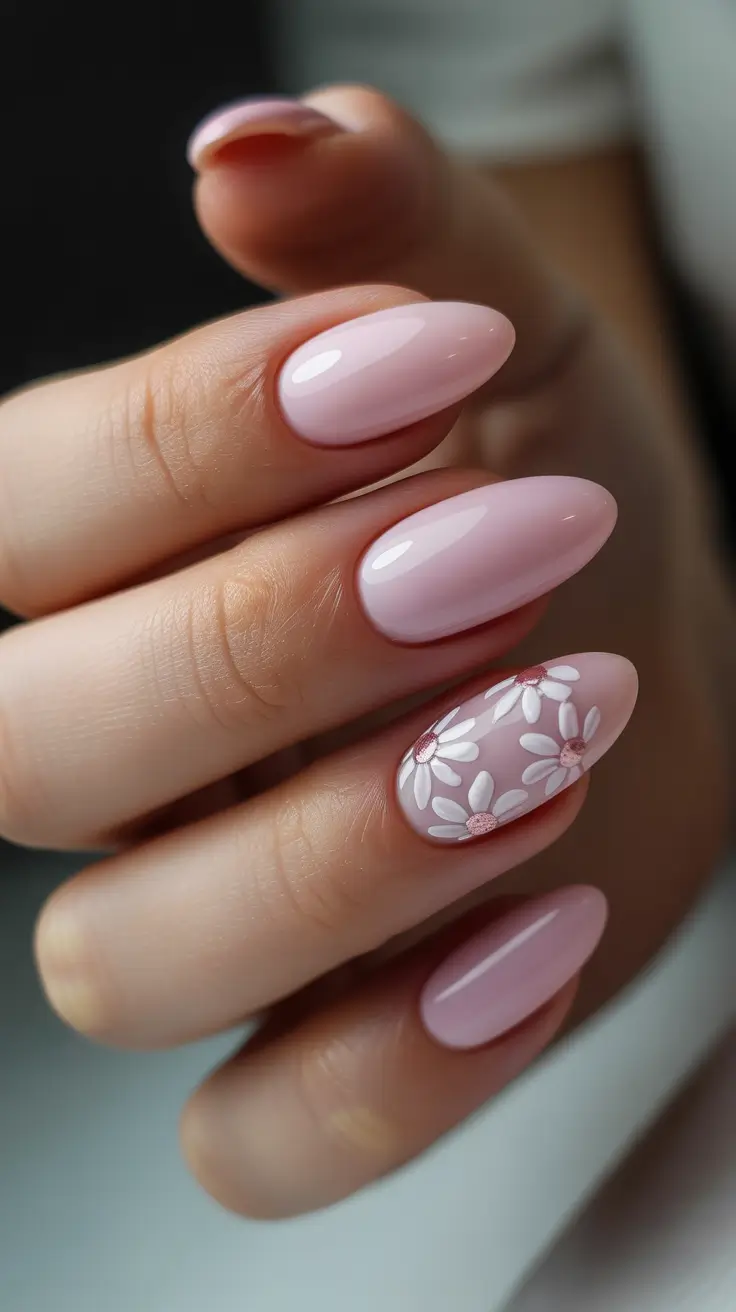
Sheer Pink Polka Dots For A Sweet Minimal Spring
This manicure is proof that simple can be adorable. A sheer blush base, glossy finish, and evenly spaced white polka dots across short oval nails – it’s clean, playful, and kind of impossible to dislike. If you’ve been searching for pink spring nails simple that still feels styled, this is the sweet spot.
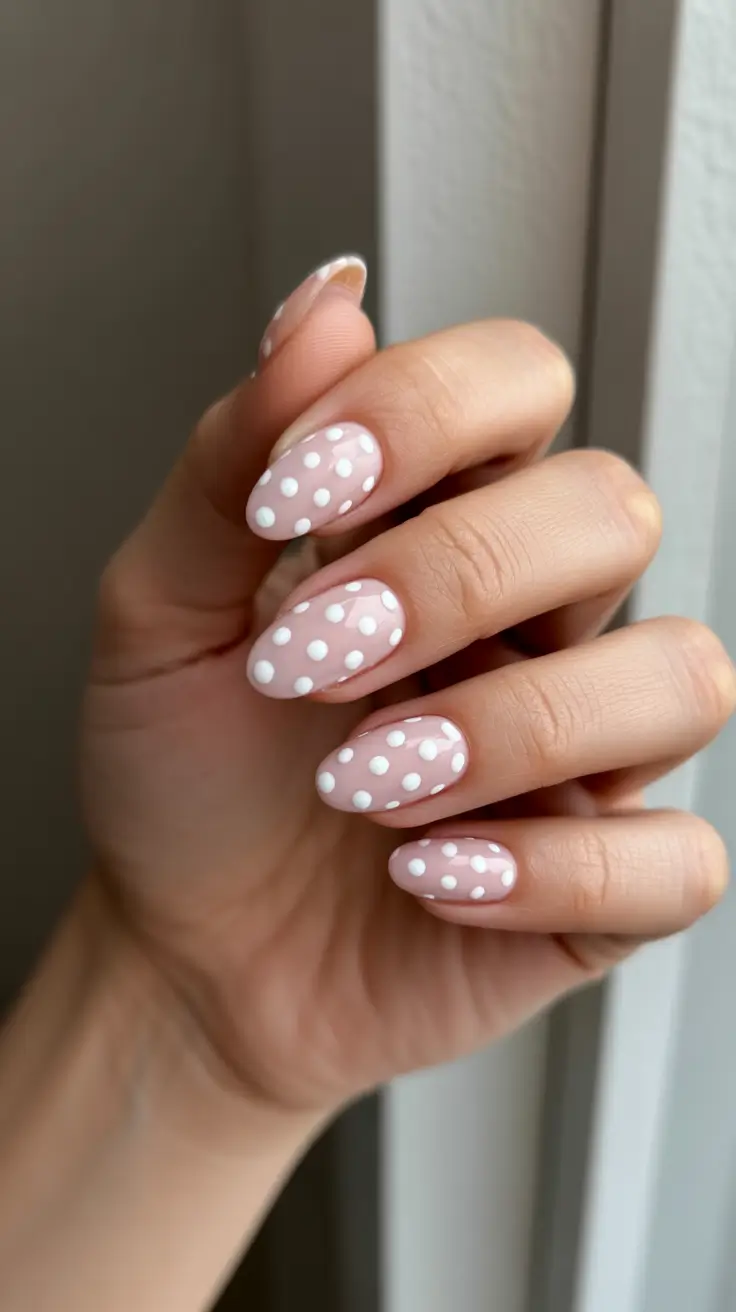
You only need three things – a sheer pink polish, opaque white, and a dotting tool (a bobby pin tip works in a pinch). I’d choose a jelly pink so it looks soft and natural, then make sure the white is truly opaque so the dots pop.
My method is low-stress – do your pink base, let it fully dry or cure, then add dots in loose rows so they look even but not robotic. The key is wiping the dotting tool between dots so the circles stay crisp. Seal with glossy top coat so it looks smooth and lasts.
This is the manicure I wear when I want my nails to look cute but I don’t want to “commit” to anything complicated. It’s Short, it’s fresh, it’s easy, and it’s honestly the kind of Ideas you can do while watching a show and still feel like you’ve got your life together.
Save Pin